Autofill Profiles
Create autofill variables and profiles to pre-populate editor fields for customers based on tag names.
Autofill Profiles pass variables assigned to users, user groups, or private contexts on a template-by-template basis when using the Print Editor in simple mode. Variables are unique text or image values identified by tag name -- when the Print Editor finds a matching tag name on a template, it automatically fills in the associated value.
The page is organized into two tabs: Autofills and Autofill Profiles. The Autofills tab manages the individual variables (tag definitions), while the Autofill Profiles tab groups those variables into named profiles that can be assigned at the company, user group, or individual customer level.
Autofills Tab
The Autofills tab displays all autofill variables in a searchable, paginated grid.
- From your Unified Admin, go to Print Editor > Autofill Profiles.
- The Autofills tab shows all defined variables.
- Click Add Variable to create a new autofill variable.
Autofills Grid Columns
| Column | Description |
|---|---|
| Id | Unique identifier for the autofill variable. |
| Tag Name | The tag name that must match a tag on the Print Editor template for auto-population to occur. |
| Visibility | Who can use this variable: Public (all users), User Group (specific user group members), or Private (admin only). |
| Locked | Checkbox indicating whether end users are prevented from modifying this field in the editor. |
| Field Type | The type of variable: Text or Image. |
| Default Value | The fallback value used when no profile-specific value is set. For text variables, shows the default text. For image variables, shows the image file name. |
| Action | Menu with Edit and Delete options. |
Add/Edit a Variable
Click Add Variable from the list view, or choose Edit from the action menu on an existing variable.
The add/edit form is split into two sections. The left side contains the variable settings, and the right side contains the field type selector and default value inputs.
| Field | Description |
|---|---|
| Tag Name | The tag identifier that must match a corresponding tag name on your Print Editor template. When the editor loads, it looks for matching tags and fills in values automatically. |
| Visibility | Controls who can use this variable: Public -- available to all users; appears in the My Account section on the storefront so customers can set their own values. User Group -- available only to members of a specific user group (B2B workflows). Private -- admin-managed only; not visible to end users. |
| Locked | When checked, prevents end users from modifying this field in the editor. Use this for fields like company logos or legal text that should not be changed. |
| Text / Default Text Value | Radio button. Select this when the variable represents a text field. Enter the default text value in the Text/Value textarea below. If left empty, the default text assigned on the template itself will be used. |
| Image / Default Selected Image | Radio button. Select this when the variable represents an image field. Choose a default image from the image library browser on the right. If no image is selected, the default image assigned on the template will be used. |
| Text/Value | The default text content for text-type variables. This value is used when no profile-specific override exists. |
| Image Selector | Browse and select a default image from the store's image library for image-type variables. The selected image ID is stored as the fallback value. |
Autofill Profiles Tab
The Autofill Profiles tab lets you create named profiles that bundle specific values for each autofill variable. Profiles can be assigned at multiple levels -- company-wide, per user group, or per individual customer -- allowing different users to see different pre-filled content on the same template.
When the editor loads, it resolves profiles in a hierarchy: customer-level profiles take priority over user group-level, which take priority over company-level.
- Select the Autofill Profiles tab.
- Click Add Profile to create a new profile.
- The grid shows all existing profiles with their ID and Name.
Profiles Grid Columns
| Column | Description |
|---|---|
| Id | Unique identifier for the profile. |
| Name | The display name of the profile. Must be unique within the storefront. |
| Action | Menu with View/Edit and Delete options. |
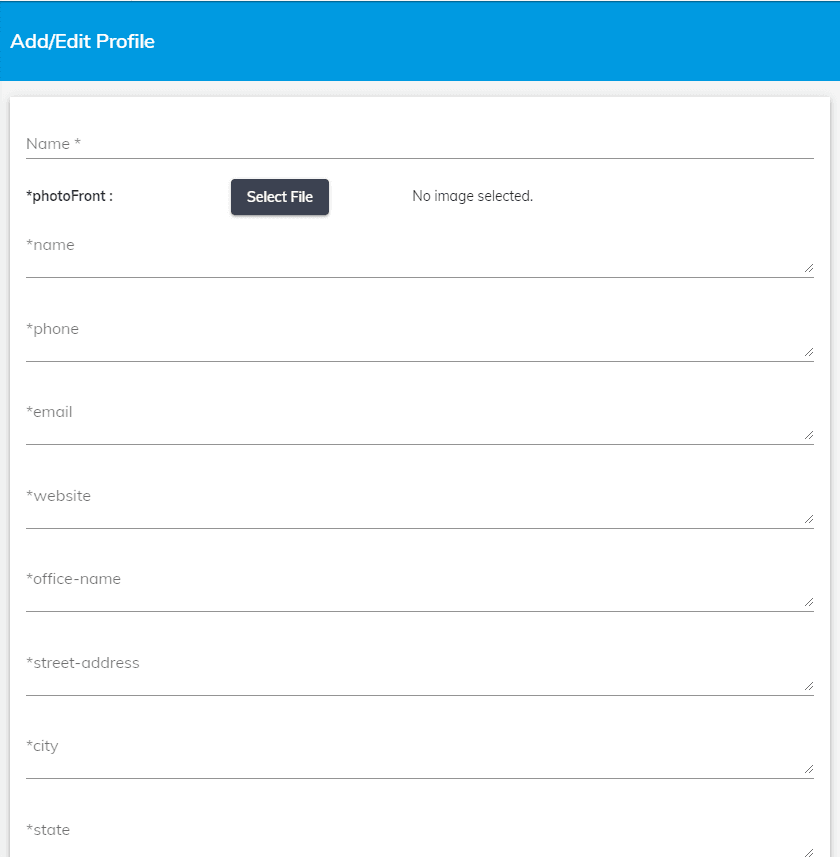
Add/Edit a Profile
Click Add Profile from the list view, or choose View/Edit from the action menu on an existing profile.
| Field | Description |
|---|---|
| Name | Required. The name of this profile. Must be unique -- the system will reject duplicate names. |
| (Variable fields) | Each autofill variable defined in the Autofills tab appears as a field in the profile editor. Text-type variables show a textarea for entering the profile-specific text. Image-type variables show a Select File button to choose an image from the library. These values override the default values defined on the variable when this profile is active. |
User Level Profiles
When you define public autofill variables, an Autofill Profiles section appears under My Account > My Info on the customer-facing storefront. This allows end users to create their own named profiles (e.g., "Marketing Campaign", "Personal Orders") and fill in their own values for public variables such as name, title, phone number, or logo. These values are then automatically applied when they open a template in the editor.
User Group Level Profiles
You can assign autofill profiles to specific user groups for B2B workflows. This allows different organizations or departments to have their own pre-filled values (e.g., company logo, address, branding).
- From your Unified Admin, go to Print Store > Users > User Groups.
- Edit a user group and navigate to the Autofill Profile tab.
- Click Add Profile to create a group-specific profile.
- Click Save.
Associations
Print Store
| Area | Effect |
|---|---|
| My Account / My Info | Public autofill variables appear as editable fields under the My Info section (myinfo.aspx) in the customer's account. Customers can create named profiles and set their own values for these fields. Controlled by the AutofillProfiles feature flag. |
| User Groups | Autofill profiles can be assigned at the user group level via the Autofill Profile tab on the user group detail page, enabling B2B workflows where each organization has pre-configured template values. |
Print Editor
| Area | Effect |
|---|---|
| Template Text Fields | Text items on editor templates have an autofill property that references a tag name. When a matching autofill variable exists, the text field is pre-populated with the profile's value. An optional autofillFormat property controls text formatting. |
| Template Image Fields | Image items on editor templates have an autofill property. When matched, the image is replaced with the profile's selected image (resolved via the image library). |
| Locked Fields | Variables marked as locked render as read-only fields in the editor, preventing end users from modifying the content. |
| Profile Resolution | The Editor API loads the appropriate autofill profile based on the current user context, resolving in priority order: customer-level, then user group-level, then company-level. |
Related Pages
- Products — manage user groups where autofill profiles can be assigned
- Product Setup — configure editor mode and assets for products using autofill
- Simple Editor — the editor mode with full autofill profile dropdown support
- Admin Mode — set tag names on template items that autofill variables match against
- Editor Settings — configure global editor defaults for storefronts using autofill